FAQ/ Introduction to DioVISTA Batch Processing
Can you tell us the basics of DioVISTA batch processing?
When I read the technical reference Batch processing / overview, I couldn't do it well.
Could you teach me how to do it from the beginning?
response
I created a tutorial.
Could you follow the steps below to get an overview?
preparation
- Prepare a PC that runs DioVISTA.
-
Obtain a project project_Tsurumi.zip for the exercises .
- Deploy to a suitable location
- In this case,
C:\temp\suppose you expand to C:\temp\Screen with the project expanded to

-
Verify that the project for the exercise can be simulated in DioVISTA.
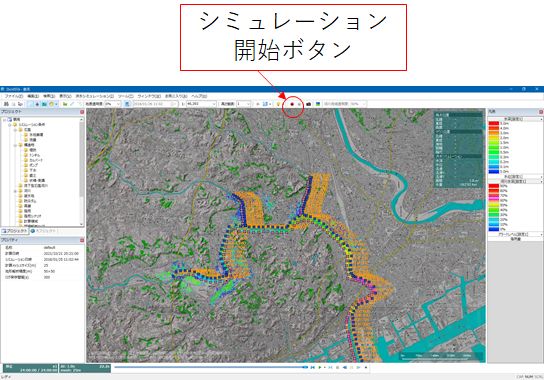
- In DioVISTA, open Project Files [鶴見.fsxproj] .
- Press the Start Simulation button
- verify that the results in the figure below are displayed
- Screen running in DioVISTA [鶴見.fsxproj]
-
Prepare to run PowerShell.
- Install PowerShell and Windows Terminal as described in FAQs/ Getting Started with PowerShell.
- For the remainder of this tutorial, Windows Terminal
wtis referred to as .
Setting variables
-
wtLaunch -
Store the path of the DioVISTA executable in a variable.
- In this case,
C:\Program Files\Hitachi\DioVISTA Flood\binit is installed in - Copy and paste the following two lines of text one line at a time
wtinto
1
2
$exe = "C:\Program Files\Hitachi\DioVISTA Flood\bin\dfsCalc64.exe" &$exe --version- verify that the build number is displayed
- example
1Build 2021-11-01 19:34:14 +0900 (0ea5431acb3bad3a7b4d5a35b9bc1f470b597f29) - In this case,
-
Stores the path of the DioVISTA data translator in a variable.
- Copy and paste the following string
wtinto .
1
2
$conv = "C:\Program Files\Hitachi\DioVISTA Flood\bin\dfsConv64.exe"
dir $conv
Source Code Explanation
- Two-line name:
dirThe command is almost identical to thedirDOS command and Linux commandls. This is another name for Get-ChildItem.
- Verify that the file information (for dfsConv64 .exe) is displayed.
-
example
1
2
3
4
5
    Directory: C:\Program Files\Hitachi\DioVISTA Flood\bin

Mode                 LastWriteTime         Length Name
----                 -------------         ------ ----
-a---          2021/06/17    21:34         323160 dfsConv64.exe
- Copy and paste the following string
-
Store the path of the DioVISTA configuration file in a variable.
- Copy and paste the following string
wtinto .
1
2
3
[xml]$xml = cat "$env:LOCALAPPDATA\hitachi\DioVISTA\DioVISTA.xml"
$d = $xml.Configuration.settings.dataset
dir $d
Source Code Explanation
- Single line name:
catThe command is almost identical to thetypeDOS command and Linux commandcat. This is another name for Get-Content. - Line 1: is the same as the
$env:LOCALAPPDATADOS environment variable%LOCALAPPDATA%. In other words, we are loading a file%LOCALAPPDATA%\hitachi\DioVISTA\DioVISTA.xml. Reference: FAQ/ Dataset file path - Line 2: Storing the xml element
Configuration.settings.datasetin a variable$d.
- Verify that the file information (about dataset.ini) is displayed.
-
example
1
2
3
4
5
    Directory: D:\mapdata

Mode                 LastWriteTime         Length Name
----                 -------------         ------ ----
-a---          2019/11/07    17:30            408 dataset.ini
- Copy and paste the following string
Basic Commands
-
You must have performed the Set Variables described above .
-
Run DioVISTA.
- Copy and paste the following string
wtinto
1
2
cd C:\temp
&$exe -d $d -m 25 -o BP001 -O . -I 300 -t 36000 鶴見.fsxproj
Source Code Explanation
- Single line name:
cdThe command iscdalmost identical to the DOS command. This is another name for Set-Location. - Two-line name:
$exei.e.dfsCalc64.exeFor options for , see Technical Reference Batch processing/Performing calculations.
- The calculation is performed.
- Check the calculation result BP001 on the DioVISTA screen.
- Copy and paste the following string
-
Convert DioVISTA result files to MLIT format.
- Copy and paste the following string
wtinto
1&$conv csv -d 40 -s $d -G -o . BP001Source Code Explanation
- For
$convthe optionsdfsConv64.exeof single line name: i.e. see Technical Reference Batch processing/MLIT CSV conversion.
- Verify that the MLIT-formatted CSV file
C:\temp\BP001has been output to .
Note
You will get the following warning about the absence of
C:\temp\and in theMETADATA.CSVfolderKENSAKU\WL_STATION.CSV, but the resulting CSV file will be output.1 2
.\METADATA.CSV: ファイルがオープンできません。 .\KENSAKU\WL_STATION.CSV: ファイルがオープンできません。 - Copy and paste the following string
Advanced Commands
- You must have performed the Set Variables described above .
-
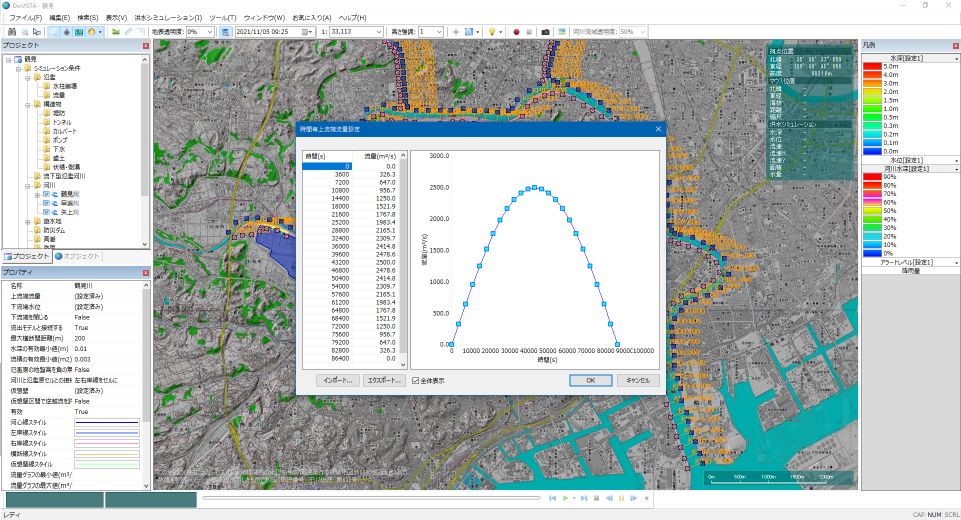
Change the upstream flow of the Tsurumi River to the [tsurumi_q_ts.csv] time series stored in .
- Copy and paste the following string
wtinto .
1 2 3 4 5 6
$csv = cat tsurumi_q_ts.csv $inflow="{0} {1}" -f $csv.Length, (($csv -split "," ) -join " ") [xml]$xml = cat 鶴見.fsxproj $river = $xml.floodSim.conditions.diffusionalRivers.diffusionalRiver |where{$_.name -eq "鶴見川"} $river.inflow = $inflow $xml.Save("C:\temp\鶴見川2500.fsxproj")Code Explanation
- Line 1: Store [tsurumi_q_ts.csv] the contents of the variable
$csv. - Converts the contents of the second line
$csv: to the format used in the DioVISTA project file (fsxproj) and$inflowstores it in a variable.-fis the Format operator. - Line 3: Store [鶴見.fsxproj] the contents of the variable
$xml - Line 4: There are multiple [鶴見.fsxproj] xml elements
floodSim.conditions.diffusionalRivers.diffusionalRiverin it , but wenameextract the element whose attribute equals "Tsurumigawa" and$riverstore it in a variable.whereis another name for Where-Object. - Line 5: Replace the contents of the XML element showing the upstream flow of the Tsurumi River
inflowwith the content created in line 2. - Line 6: Save the edited contents as the file "C:\temp\Tsurumigawa 2500.fsxproj". Here, specify the full path of the file to be saved.
- Open Project Files in DioVISTA [鶴み川2500.fsxproj] .
- Verify that the upstream flow of the Tsurumi River[tsurumi_q_ts.csv] is in the time series stored in .
- Copy and paste the following string
-
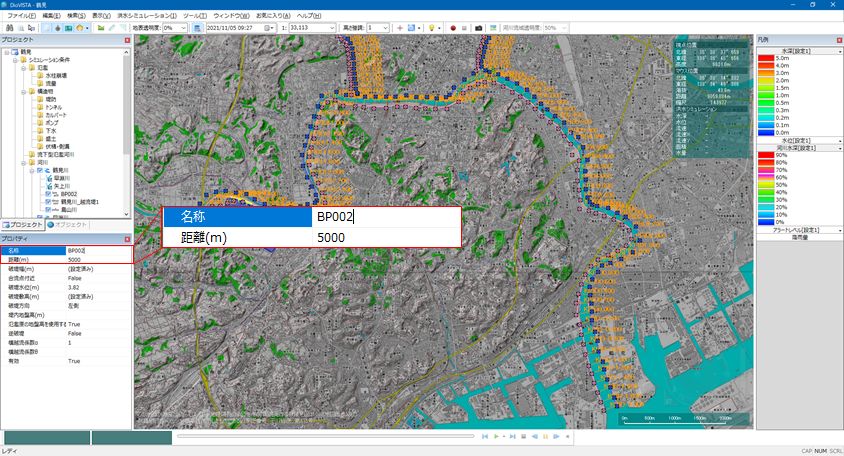
Change the breach point information of the Tsurumi River.
- Copy and paste the following string
wtinto
1
2
3
4
5
6
[xml]$xml = cat 鶴見.fsxproj
$river = $xml.floodSim.conditions.diffusionalRivers.diffusionalRiver |where{$_.name -eq "鶴見川"}
$breach = $river.riverBreaches.riverBreach|where{$_.name -eq "鶴見川_破堤箇所1"}
$breach.name = "BP002"
$breach.distance = "5000"
$xml.Save("C:\temp\BP002.fsxproj")
Code Explanation
- Line 1: Store [鶴見.fsxproj] the contents of the variable
$xml. - In the second line: [鶴見.fsxproj] there are multiple xml elements
floodSim.conditions.diffusionalRivers.diffusionalRiver, of which the attributenameequals "Tsurumigawa" is extracted and$riverstored in a variable. - Line 3: There are several child elements of
riverBreaches.riverBreachTsurumi River , but we extract the element whose attributenameequals "Tsurumi River_Break Point 1" and$breachstore it in the variable . - Line 4: Replace the contents of the xml element indicating "Tsurumi River_Breakpoint 1
name" with "BP002". - Line 5: Replace the contents of the xml element indicating "Tsurumi River_Breakage 1
distance" with "5000". - Line 6: Save the edited content as the file "C:\temp\BP002.fsxproj".
- Open Project Files in DioVISTA [BP002.fsxproj] .
- Make sure that the name of the break point of the Tsurumi River [BP002] is and the distance [5000] is .
- Copy and paste the following string
At last
-
In a series of tutorials, you experienced running project files, converting result files, rewriting project files, and creating script files. Modify or combine these as needed by the user.
-
DioVISTA checks for outliers when the user enters through the screen (for example, if you try to give a roughness of 0, it will be rejected). In this way, when editing the project file (fsxproj) without going through the screen, outlier values are not checked. When editing, be aware of outliers.