Projects/KML Objects/Data
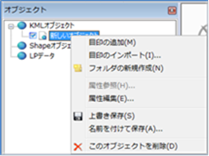 Figure: KML Object Data
Table: KML Object Data Context Menu Items and Functions
| Context menu items | function |
|---|---|
| Add placemarks | Create a placemark. You can create multiple objects in a single KML object. |
| Import placemarks | Import placemark information from a CSV format file. |
| Create a new folder | Create a new folder. You can manage multiple objects in folders. |
| Attribute references | Displays the attributes of KML objects in balloons on the map. If the attribute is not set, it cannot be selected. |
| Attribute Edit | Edit the attributes of the KML object. |
| Save | Save the changes to the KML object. |
| Save As | Save a new KML object. |
| Delete this object | Delete individual KML objects. |
Add placemarks
-
Click on the map and mark a placemark.
When you click on the map, a[property] dialog (shown below) appears.
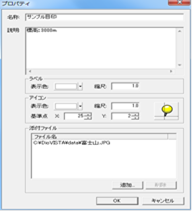
Figure: Displaying the Properties dialogTable: Properties dialog items and descriptions
item explanation name Set the name of the placemark. explanation Enter a description. A
balloon is displayed when a KML attribute reference is made.label Display color Sets the color of the placemark label. Scale Sets the size of the placemark label at scale. icon Display color Sets the color of the icon. Scale Sets the size of the icon in scale. Reference point X Sets the X coordinate of the reference point of the icon's location.
The icon image displays a preview.Y Sets the Y coordinate of the registration point of the icon location.
The icon image displays a preview.Icon image Select an icon image.
When clicked, a [Icon selection] dialog appears. Select an icon image.
Displays the selected icon and a reference point on the image.attachment Set the attachment.
The configured attachment can be opened from the balloon displayed in the KML attribute reference. -
[OK] button. A placemark is created.
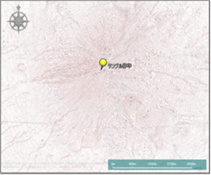
Figure: Create a placemark
-
Move a placemark
Move the position of the placemark.
Click on the map and specify a location. The placemark moves to the location you clicked.
-
Attribute references
Displays the attributes of the placemark as balloons on the map.
If the attribute is not set, it cannot be selected.
When you select the menu, a balloon displays the attributes of the placemark.
Click the attachment name to select it to open the attachment.
 Figure: Display placemark attributes as balloons on a map
 -
Attribute Edit
Edit the placemark's attributes.
-
When you select a menu,[property] a dialog appears.
-
[property] In the dialog, set the placemark information.
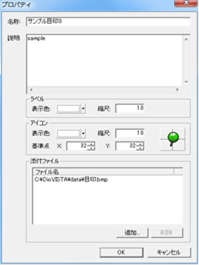
図: 属性の編集のプロパティダイアログ表: 属性の編集のプロパティの項目と説明
項目 説明 名称 目印の名称を設定します。 説明 説明を入力します。
属性参照をした場合にバルーン表示されます。アイコン アイコン画像 アイコン画像を選択します。
クリックすると、[アイコン選択] ダイアログが表示されます。アイコン画像を選択します。
選択したアイコンと、画像上に基準点を表示します。基準点 X アイコンの位置の基準点のX座標を設定します。
アイコン画像に、プレビュー表示されます。Y アイコンの位置の基準点のY座標を設定します。
アイコン画像に、プレビュー表示されます。添付ファイル 添付ファイルを設定します。
設定した添付ファイルは、属性参照で表示されるバルーンから開くことができます。 -
[OK] button.
目印の属性が作成されます。
-
-
Delete this object
Select the menu to remove the placemark.
-
Import placemarks
-
The CSV file of placemark information should be in the following format.
Please include four items: name, latitude, longitude, and description.
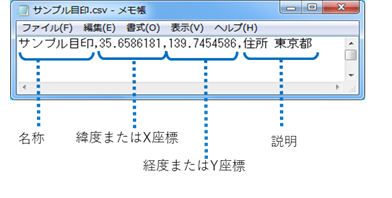
Figure: CSV file format for placemark information -
[Open a file] Select the placemark CSV file in the dialog[open] and click the button.
[Import placemarks] A dialog (shown below) appears.
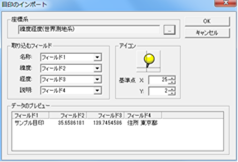
Figure: Import placemark dialogTable: Import placemark dialog items and descriptions
item explanation coordinate system Set the coordinate system. Fields to include Set the corresponding fields for Name, Latitude, Longitude, and Description. icon Icon image Select an icon image.
When clicked, a [Icon selection] dialog appears. Select an icon image.
Displays the selected icon and a reference point on the image.Reference point X Sets the X coordinate of the reference point of the icon's location.
The icon image displays a preview.Y Sets the Y coordinate of the registration point of the icon location.
The icon image displays a preview.Previewing data Displays the data preview of the imported CSV file. -
[OK] button.
The placemark is imported.
Create a new folder
When you select a menu, [New Folder] an item is created.
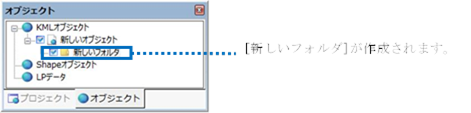 Figure: Creating a new folder item
Attribute references
Select the menu.
The attributes of the target KML object are displayed in balloons.
Click the attachment name to select it to open the attachment.
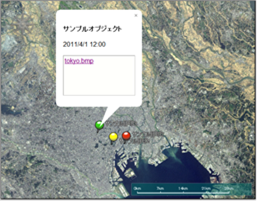 Figure: Balloon display of KML objects.
Attribute Edit
-
When you select a menu,[property] a dialog appears.
-
[property] In the dialog, set the information for the KML object.
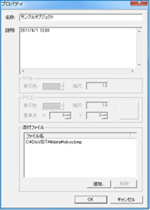
Figure: KML Object Info Properties dialogTable: KML Object Infosetting Properties Items and Descriptions
item explanation name Set the name of the KML object. explanation Enter a description.
If you make an attribute reference, a balloon is displayed.attachment Set the attachment.
The attached file you set can be opened from the balloon displayed in the attribute reference. -
[OK] button.
Attributes of the KML object are created.
Save
Select the menu to save changes to the KML object.
For new KML objects that have not been saved,[Save As] a dialog is displayed. Specify the save destination and save it.
For existing KML objects, overwrite and save.
Save As
[Save As] Specify the save location in the dialog[preservation] and click the button.
The KML object is saved.
Delete this object
Selecting the menu deletes the KML object.