Menu Bar/ Flood Simulation
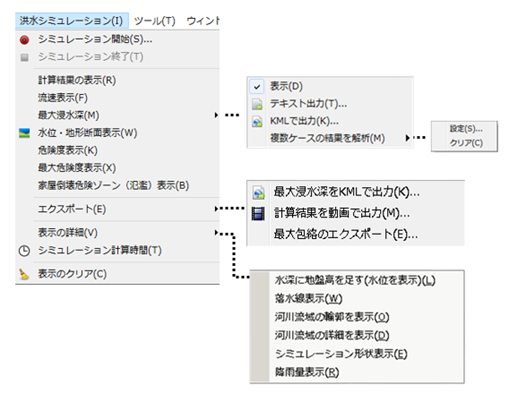 Figure: Flood simulation menu
Table: Flood simulator menu items and features
| item | function | |
|---|---|---|
| Start Simulation | Configure and run the simulation settings. | |
| End of Simulation | Terminate a running simulation. | |
| Viewing calculation results | Displays the calculation results in real time. | |
| Flow velocity display | Show/hide flow velocity. | |
| Maximum immersion depth | indication | Displays the maximum immersion depth. |
| Text output | Outputs the maximum immersion depth to text. | |
| Output in KML | KML output of the maximum immersion depth. | |
| Multi-case results and analysis | The maximum immersion depth of multiple simulation results is superimposed. | |
| Water level and topographic cross-sectional display | Displays the topographic section and water level for a specified range. | |
| Risk display | Displays the degree of danger according to the water depth and flow velocity. | |
| Maximum risk indication | Displays the maximum risk level. | |
| House collapse zone display | Displays the collapse zone of the house. | |
| export | Maximum immersion depth output in KML | KML output of the maximum immersion depth. |
| Output calculation results as a video | Prints videos. | |
| Export Maximum Envelope | The maximum envelope inundation depth is output from multiple calculation results in CSV and netCDF formats. | |
| Display details | Add ground height to water depth (water level is displayed) | The water level is displayed by adding the ground height value to the water depth of the simulation result. |
| Waterfall line display | Displays a waterfall waterline. | |
| View the outline of the river basin | Displays the outline of the river basin. | |
| View river basin details | View river basin details. | |
| Simulation shape display | Displays the meshed boundary conditions on a map. | |
| Rainfall display | Displays rainfall data captured by the rainfall scenario function. The display is displayed when the Watershed Analysis item in the rainfall data properties is enabled. | |
| Simulation calculation time | Displays the calculation time for the simulation. | |
| Clear display | Clears the simulation results displayed on the map. |
Start Simulation
-
When you select a menu, [Start Simulation] a dialog appears. Configure the simulation settings.
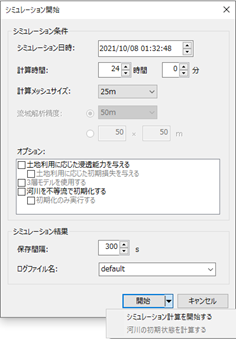
Figure: Start Simulation dialog- Simulation conditions
item explanation Simulation date and time Set the start date and time for the simulation. Calculation time Set the simulation calculation time.
You can enter up to 4,000 hours and 59 minutes. If you set 0 hours and 0 minutes, the calculation will be performed indefinitely.Calculated Mesh Size Sets the mesh size to be calculated.
[0.5m/1m/2m/5m/10m/25m/50m/100m/250m/500m/1km/5km]Watershed analysis accuracy Sets the mesh size for watershed analysis.
[1m/2m/5m/10m/25m/50m/100m/250m/500m/1km/5km]- option
item explanation Provide infiltration capacity according to land use Check if you want to enable seepage loss for each land use. Give initial losses based on land use Check if you want to enable initial loss for each land use. Use a three-tier model Check when using a three-layer model. Initialize rivers with unequal flow Check when the river is initialized with unequal flow.
Reference: Technical Reference/ River Model/ Initialized with Unequal FlowPerform initialization only Check if you want to perform initialization only. - Simulation Results
item explanation Save interval Set the interval (in seconds) at which the simulation result log is saved.
Valid values are 1~600 seconds.Log File Name Set the desired log file name. -
[beginning] button.
The simulation starts.
End of Simulation
Select the menu to kill a running simulation.
A simulation result log up to the time of execution is created.
Viewing calculation results
Select the menu to view the calculation results.
Select the menu again to hide the calculation results.
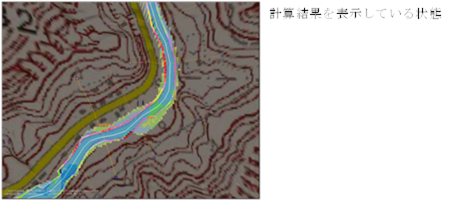 Figure: Displaying calculation results
Flow velocity display
Select the menu to display the velocity vector.
Select the menu again to hide the velocity vector.
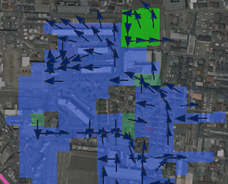 Figure: Displaying velocity vectors
Maximum immersion depth
-
indication
Select the menu to display the maximum immersion depth on the map.
Select the menu again to hide the maximum immersion depth.
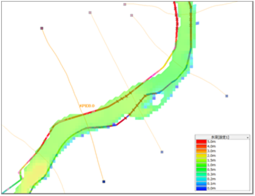 Figure: Displaying the maximum immersion depth
 -
Text output
With the maximum immersion depth displayed, select the menu and specify the save destination.
-
Output in KML
With the maximum immersion depth displayed, select the menu and specify the save destination.
-
Multi-case results and analysis
[establishment] When you select a menu, [Multiple cases maximum immersion depth] a dialog appears.
Select the simulation results log for which you want to view the maximum immersion depth [OK] and click the button.
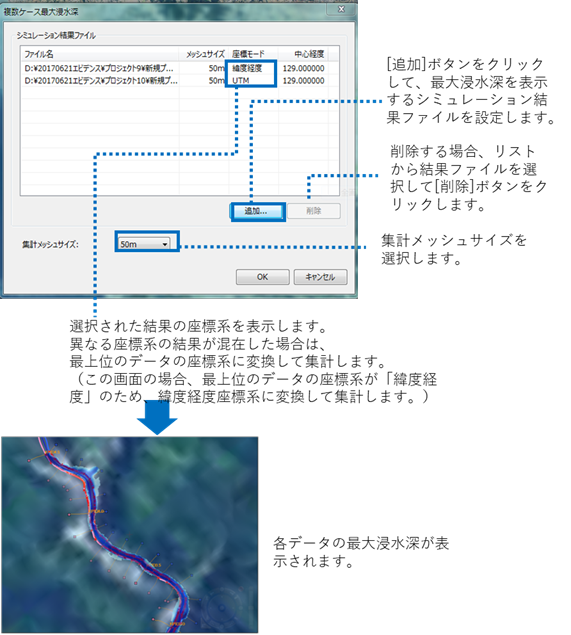 Figure: Multi-case maximum immersion depth dialog/Maximum immersion depth display for each data
To clear the maximum flood depth display [clear] , select the menu.
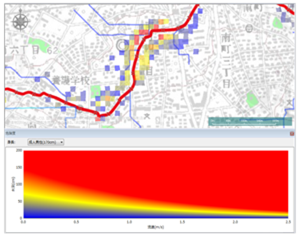
Risk display
Select the menu to display the level of danger (difficulty in walking).
Walking difficulty is calculated from the depth and velocity of the water.
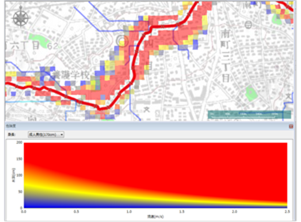
Maximum risk indication
Select the menu to display the maximum risk level during the simulation period.
House collapse zone display
Select "True" for the "Calculate house collapse risk zone (flood)" item in the project properties.
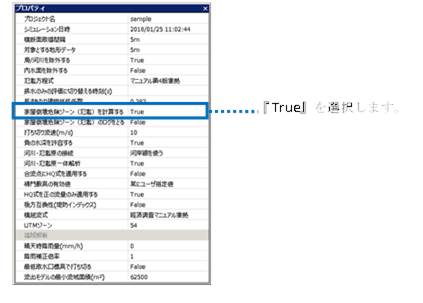 Figure: Properties for calculating building collapse risk
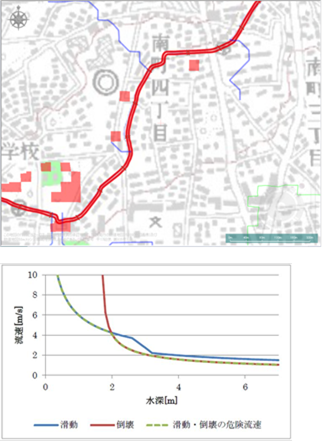
Select the menu to display a mesh that has exceeded the flow velocity that is at risk of either sliding or collapsing buildings.
-
Displaying a Mesh After Selecting a Menu
export
-
Maximum immersion depth output in KML
- Select the menu and choose where you want to save it.
-
Output calculation results as a video
-
The location to output the video is displayed on the map.
The displayed map screen becomes the camera angle of the video as it is.
Display the map display, location, and depression angle.
-
[Output calculation results as a video] Select the menu, set the output conditions, and [OK] click the button.
A video file is created in the specified output destination.
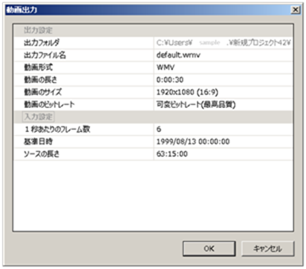 Figure: Output the calculation result as a video
Table: Video output menu items and descriptions
item explanation Output settings Output Folder Displays the output folder name. Output File Name Set the destination and file name. Video Formats You can choose between WMV and MPEG-4. Video length Set the length of the video to be output. Video size Select the size of the video. Video bitrate Select the bitrate. Input settings Frames per second Sets the number of frames per second. Base date and time Specifies the date and time on which to display elapsed time. Source length Set the simulation time. -
-
Export Maximum Envelope
-
Add simulation results.
Select the Export Maximum Envelopes [addition] dialog button.
[open] Select the simulation result file (*.fsxidx) in the dialog box and [open] click the button.
[Ctrl]You can select multiple files while holding down the key, and [Shift] specify the range of files while holding down the key.
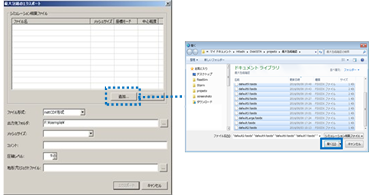 Figure: Adding simulation results
 -
In the Export Maximum Envelopes dialog, set the output conditions [export] and click the button.
Export maximum envelope data and home collapse risk area data.
The output range is 50 km from east to west and 50 km from north to south.
If the output range is exceeded, an error occurs.
Table: Output settings and contents of the Export Maximum Packets dialog
Output setting items substance File format Select the output file format "CSV format" / "netCDF format". Destination Folder Select the folder where METADATA.csv* resides. Mesh Size Select a mesh size.
By default, the calculated mesh size is selected.
* No matter which mesh size you specify, 5m ground height information will be used.comment Valid only when NetCDF format is selected.
Sets the string to be included in the comment attribute in NetCDF. Blanks are usually fine.Compression level Valid only when NetCDF format is selected.
Set the NetCDF compression ratio to 0 (no compression), 1 (low compression) ~ 9 (high compression).terrain project file You can specify the 5m terrain data to be used when calculating the results.
However, only the 5m terrain data of the calculation area created in the latitude-longitude system is applied. Also, if the
calculation is made with a 5m mesh, the terrain in the calculation log will be applied, so it will not be applied even if you specify it.* Ministry of Land, Infrastructure, Transport and Tourism Guidelines for Digitization of Flood Expected Area Map (3rd Edition) Reiwa September of the first year (Flood Edition) Table 4 Contents of metadata file, URL
-
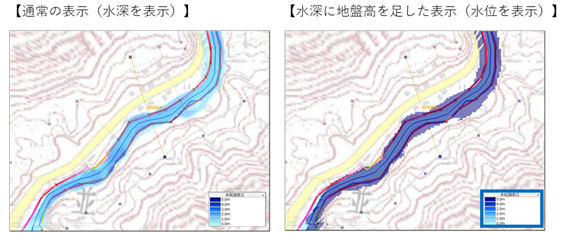
Display details
-
Add ground height to water depth (water level is displayed)
When you select the menu, the water depth plus the ground height (water level) is displayed.
The coloring (legend) used to display the water level is based on the "water level" in the legend dialog.
-
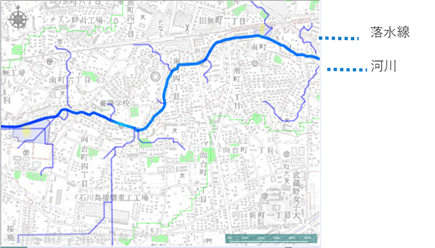
Waterfall line display
Select the menu to view the main waterfall lines flowing from the watershed into the river.
-
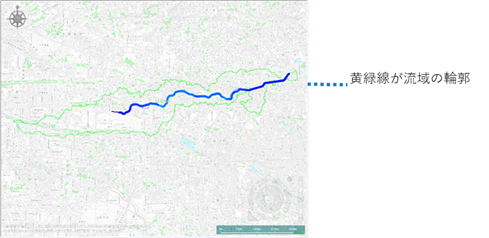
View the outline of the river basin
Select the menu to view the outline of the river basin.
-
View river basin details
Select the menu to view details of the river basin.

-
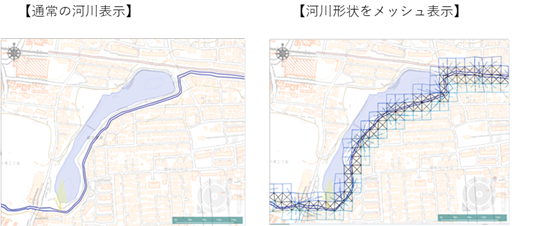
Simulation shape display
Select the menu to view the meshed boundary conditions.
-
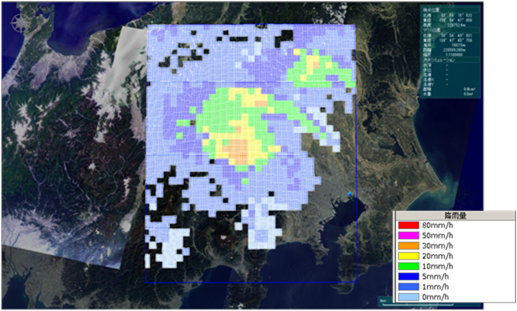
Rainfall display
Select a menu to color the mesh according to rainfall.
Clear display
Select the menu to clear the displayed simulation results.