FAQ/ I want to import shapefile data into the calculation area
Land use data was created in shapefile.
Can I import this in DioVISTA?
Manuals/ Projects/ Calculation area/ Land use/ Import did not describe how to import shapefiles.
response
DioVISTA does not allow you to import shapefile data directly.
Here is an example using QGIS:
-
Convert the shapefile to asc format.
- Launch QGIS. Load the target shapefile.
- Select Menu [Raster] > > [transformation] [Rasterizing vectors] >.
- In the dialog that appears, enter the conditions as shown below.

- This example shows the case where the coordinate system is a latitude-longitude system (EPSG: 4612) and a mesh size of 10 m. For other cases, please refer to About Horizontal and Vertical Resolution.
- [Horizontal resolution] = 0.000125
- [Vertical resolution] = 8.333333333333333e-05
- [Output Area] = [....] Click [Using Layers Regions] Select the source layer from
- If there is an invalid[Fixed burn value] value, [Assign a specified NODATA value to the output band] specify an invalid value for , .
- Specify the integer type [Output data type] in for integer and the real type in [Output data type] for real.
- [GDAL/OGR console] It looked like this:
gdal_rasterize -l __県メッシュ____水系 -a 土地利用_1 -tr 0.000125 8.333333333333333e-05 -a_nodata 0.0 -te 130.0 30.0 130.1 30.1 -ot Int16 -of GTiff C:/temp/__県メッシュ____水系.shp C:/.../OUTPUT.tif- Select Menu [Raster] > > [transformation] [Format conversion] >.
- In the dialog that appears, enter the conditions as shown below.
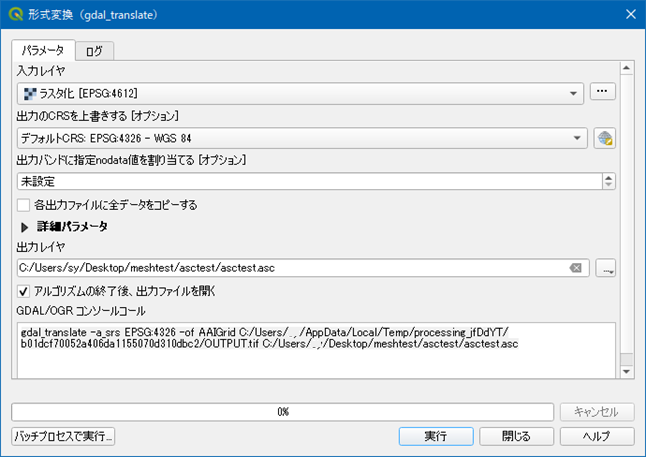
- [Overwrite CRS in output] = [Default CRS: EPSG: 4326 - WGS 84]
- [Output Layer] = > [...] > [Save to File...]
C:/temp/landusemesh.asc - [GDAL/OGR console] It looked like this:
gdal_translate -a_srs EPSG:4326 -of AAIGrid C:/.../OUTPUT.tif C:/temp/landusemesh.asc
-
Create a DioVISTA project.
- Launch DioVISTA.
- [menu] Select > [Create new from template] > [Latitude and longitude coordinates] .
- In the dialog that appears,[Center latitude] enter . Here, enter the value in units of 1/3 degree. (35, 35.333334, 35.666667, etc.)
- Reference: Manual/ Menu bar/ File/ Create new from template/ Latitude and longitude coordinates
- Save the project.
- Here
C:\Temp\新規プロジェクト1, let's say you save it as a folder andC:\Temp\新規プロジェクト1\新規プロジェクト1.fsxprojcreate a project file.
- Here
-
Create a calculation area in the created DioVISTA project.
-
Save the following PowerShell script to a file.
- Copy and paste the script below into Notepad (
notepad.exe). - In Notepad
$projFile, set the variables ,$outProjFile$ascFile$meshSize, (edit the value to the right of in$centerLatitudeeach line highlighted in the script below=). - In Notepad [menu] , select >[file]> and save it as [Save As] a file in
C:\Temp\新規プロジェクト1the folderImportFromAsc-ToFsxproj.ps1.
 1
 2
 3
 4
 5
 6
 7
 8
 9
10
11
12
13
14
15
16
17
18
19
20
21
22
23
24
25
26
27
28
29
30
31
32
33
34
35
36
37
38
39
40
41
42
43
44
45
46
47
48
49
50
51
52
53
54
55
56
57
58
59
60
61
62
63
64
65
66
67
68
69
70
71
72
73
74
75
76
77
78
79
80
81
82
83
84
85
86
87
88
89
90
91
# 取り込み先のプロジェクトファイルを指定します. # このファイルに ASC ファイルを取り込みます。 $projFile = ".\新規プロジェクト1.fsxproj" # 保存先のプロジェクトファイルを指定します(フルパスで指定). # ASC ファイルを取り込んだ結果を、このファイル名で保存します。 $outProjFile = "C:\temp\新規プロジェクト2.fsxproj" # Esri Raster ASC ファイルを指定します $ascFile = "C:\temp\landusemesh.asc" # メッシュサイズを指定します. # 選択肢: 5, 10, 25 $meshSize = 10 # 中心の緯度を指定します. # 選択肢: 緯度 20 度から50度まで、1/3度単位 # 20.000000, ..., 35.000000, 35.333334, 35.666667, ..., 50.000000 のいずれか $centerLatitude = 35.000000 # メッシュ解像度情報のcsvファイルを指定します. $meshResolutionsCsv = ".\meshResolutions.csv" $asc = cat -Encoding utf8 $ascFile [int] $ncols = (($asc | ? { $_ -match "^ncols" } ) -split " +")[1] [int] $nrows = (($asc | ? { $_ -match "^nrows" } ) -split " +")[1] [double] $xllcorner = (($asc | ? { $_ -match "^xllcorner" } ) -split " +")[1] [double] $yllcorner = (($asc | ? { $_ -match "^yllcorner" } ) -split " +")[1] [double] $dx = (($asc | ? { $_ -match "^dx" } ) -split " +")[1] [double] $dy = (($asc | ? { $_ -match "^dy" } ) -split " +")[1] $DEG2RAD = [math]::PI / 180 $x0 = $xllcorner * $DEG2RAD $y0 = $yllcorner * $DEG2RAD $x1 = ($xllcorner + $dx * $ncols) * $DEG2RAD $y1 = ($yllcorner + $dy * $nrows) * $DEG2RAD $resols = Import-Csv -Encoding utf8 $meshResolutionsCsv | % { [double] $_.lat = $_.lat [double] $_.hScale = $_.hScale [double] $_.vScale = $_.vScale $_ } $resol = $resols | sort -Property @{Expression = { [math]::Abs($_.lat - $centerLatitude) }; } | select -First 1 $hScale = $resol.hScale $vScale = $resol.vScale $ox = $xllcorner * $DEG2RAD * $hScale $oy = ($yllcorner - $centerLatitude) * $DEG2RAD * $vScale [xml] $xml = cat -Encoding utf8 $projFile $xCalcDomain = $xml.CreateElement("calcDomain") [void]$xml.floodSim.conditions.calcDomains.AppendChild($xCalcDomain) $attrs = @{ "name" = "計算領域1" "valid" = "True" "inlandWatersAsSea" = "False" "lineStyle" = "0 2 128 64 0 192" "gridLineStyle" = "0 1 128 128 128 192" } $attrs.GetEnumerator() | % { $xAttr = $xml.CreateAttribute($_.Name) $xAttr.Value = $_.Value [void]$xCalcDomain.Attributes.Append($xAttr) } $xPts = $xml.CreateElement("pts") [void]$xCalcDomain.AppendChild($xPts) $coords = (($y0, $x0), ($y0, $x1), ($y1, $x1), ($y1, $x0)) foreach ($coord in $coords) { $xCoord = $xml.CreateElement("coord") [void]$xPts.AppendChild($xCoord) $xCoordNode = $xml.CreateTextNode(("{0} {1}" -f $coord[0], $coord[1])) [void]$xCoord.AppendChild($xCoordNode) } $xMeshResolution = $xml.CreateElement("meshResolution") [void]$xCalcDomain.AppendChild($xMeshResolution) $attrs = @{ "name" = ("{0}m" -f $meshSize) "active" = "True" "coordMode" = "1" "utmZone" = "0" "centerLatitude" = $centerLatitude "meshOrigin" = ("{0} {1}" -f $ox, $oy) "meshSize" = $meshSize "dims" = ("{0} {1}" -f $nrows, $ncols) } $attrs.GetEnumerator() | % { $xAttr = $xml.CreateAttribute($_.Name) $xAttr.Value = $_.Value [void]$xMeshResolution.Attributes.Append($xAttr) } $xml.Save($outProjFile) - Copy and paste the script below into Notepad (
-
Save meshResolutions.csv to a folder
C:\Temp\新規プロジェクト1. - Run Poweshell.
1
2
cd 'C:\Temp\新規プロジェクト1'
.\ImportFromAsc-ToFsxproj.ps1
-
-
Import the asc file into the DioVISTA project.
- [project] [Calculation area] Right-click [Calculation Area 1] >>> [10m] and [Add a land-use mesh] select .
- Right-click [land use]the Added and [import] select .
- Select the ASC file you created in step 1. Data ingested.
- Here we have shown the steps to import a 10m mesh, but you [land use] [topography] can use the [Roughness] same procedure to load the 5m, 10m, and 25m mesh sizes [Porosity] [Transmittance X] , [Transmittance Y]. [land use]
About horizontal and vertical resolution{: #_other-crs-or-resolution}
- If the coordinate system of the source data is a latitude-longitude system
- The coordinate system of the source data is EPSG:4326, EPSG:4612 or EPSG:6668.
- [Horizontal resolution] and specify the [Vertical resolution] mesh size in degrees.
- For commonly used mesh sizes, see and in Number [Longitude (degrees)]of cubic mesh divisions[Latitude (degrees)].
- If the coordinate system of the source data is a planar rectangular coordinate system
- If the coordinate system of the source data is the so-called 19 coordinates, EPSG: 2443 - EPSG: 2461 or EPSG: 6669 - EPSG: 6687.
- [Horizontal resolution] and specify the [Vertical resolution] mesh size of the original data in m.
- Project(
gdalwarp). [menu] For the dialog that appears at > [Projection] >, [Reprojection] specify the following:- [Destination CRS] = [Default CRS: EPSG: 4326 - WGS 84]
- [Resampling method] = [Average]
- [Additional Command Line Parameters] = [-tr 0.0003125 2.083333333333333e-4]
(*In the case of 25m mesh.) For other meshes, see and in Number [Longitude (degrees)]of cubic mesh divisions[Latitude (degrees)]. )
Related item
Last update:
2023-03-20