Project/Calculation Area
Main applications
- Set the floodplain (topography, roughness factor, porosity, transmittance, land use).
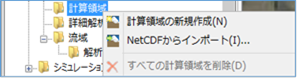 Figure: Calculation area
Table: Context Menu Items and Functions in the Calculation Area
| Context menu items | function |
|---|---|
| Creating a New Compute Area | Create a new calculation area. |
| Import from NetCDF | Import from a NetCDF file. |
| Delete all compute space | Delete all of the calculation space. |
Creating a New Compute Area
-
Click the mouse to specify the area on the map where you want to create the calculation area with a rectangle.
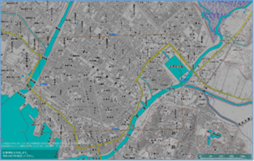
Figure: Specifying the area for creating the calculation area -
To revert to the previous state, right-click or[BackSpace] press the key.
-
To cancel the creation,[Esc] press the key.
-
Confirm with double click or enter.
-
Select the mesh size of the calculation area.
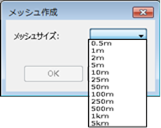
Figure: Selecting the mesh size of the calculation area -
Set the conditions related to the calculation area on the property screen.
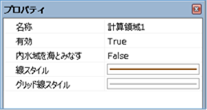 Figure: Property screen for condition setting in the calculation area
Table: Calculation Area Property Names and Settings
| Property Name | What to set |
|---|---|
| name | Enter a name of your choice. |
| valid | Enable/disable settings. The initial value is True. True: Enabled: False: Disabled |
| Consider inland waters as oceans | Sets whether inland waters are treated as ocean or land. It is related to whether or not river run-up is considered during storm surge analysis. The initial value is "False" (treated as land). "True": Sea treatment "False": Land treatment |
| Line Style | Specify the line style (line type/line width/line color) to be displayed on the map. The initial values are as follows: Linetype: Solid Line Width: 2px Linecolor: RGB (128,64,0) |
| Gridline style | Specify the grid line style (line type/line width/line color) of the data (terrain, roughness, porosity, transmittance) to be displayed on the map. The initial values are as follows: Linetype: Solid Lineweight: 2px Linecolor: 50% gray |
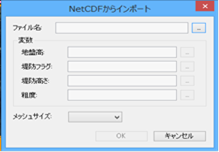
Import from NetCDF
-
When you select the menu, the Import from NetCDF dialog (shown below) appears.
-
Select a file name, specify a variable, mesh size, and[OK] choose the button.
-
For more information about the netCDF file format, please refer to the Technical Reference I/O function/Terrain, roughness, and fill import function/NetCDF format.
Delete all compute space
When you select the menu, a confirmation message appears. [Yes] Click the button to delete all calculation space data.
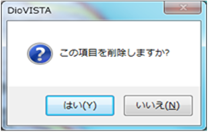 Figure: Delete all compute areas