Menu bar/ Files
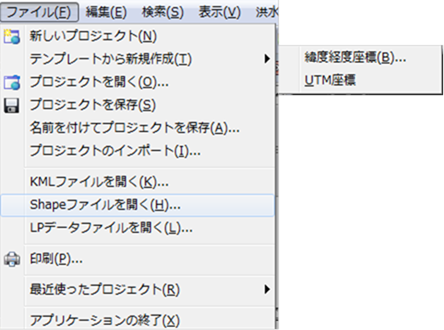 Figure: File menu
Table: File menu items and functions
| Menu Items | function | |
|---|---|---|
| New Projects | Create a new project. | |
| Create new from template | Latitude and longitude coordinates | The coordinate system to be calculated is latitude-longitude coordinates. |
| UTM coordinates | Set the coordinate system to be calculated to UTM coordinates. | |
| Open a project | Open an existing saved project. | |
| Save Project | Save the project. | |
| Save Project As | Save the new project with a different name. | |
| Importing a Project | Capture simulation conditions from an existing project. | |
| Opening KML files | Open the KML file. | |
| Opening SHAPE files | Open the Shape file. | |
| Opening LP data files | Open the LP data file. | |
| printing | Print the screen displayed in the map window. | |
| Recent Projects | Displays a list of recently used projects. | |
| Application Termination | Quit DioVISTA. |
New Projects
Select the menu to open a new project.
If you have not saved an open project, a save confirmation message appears.
Create new from template - latitude and longitude coordinates
The coordinate system to be calculated is latitude-longitude coordinates.
If the project has not been saved, a save confirmation message appears.
Note
If you select latitude-longitude coordinates, the length in the longitude direction depends on the latitude. For more information, see FAQ/What is a Standard Geo Mesh?
-
When you select a menu, [Create new latitude and longitude coordinates] a dialog appears.
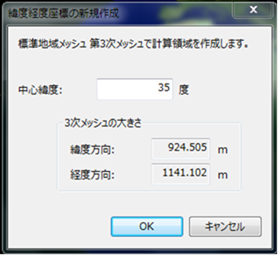
- Input Range: -85~85
- Input precision: 6 decimal places
- Based on the center latitude set by the user, the latitude and longitude lengths of the cubic mesh (about 1 km) are displayed.
The figure shows that Center latitude for 35 degrees, the cubic mesh has a latitudinal length of 924.505 m and a longitude length of 1141.102 m.
Note
If the value given by the user is not a multiple of 1/120 degree (a multiple of Center latitude 30 seconds), it will be corrected to a multiple of 1/120 degree. For the modified center latitude, please check the project properties Center latitude . This is because the latitude that a standard area mesh can take is limited to multiples of 1/120th of a degree (a multiple of 30 seconds).
-
Sets the center latitude of the calculated area.
-
[OK] Click the button to set the specified center latitude information to the project information.
You cannot change the center latitude information during project creation.
The project properties display the specified center latitude information.
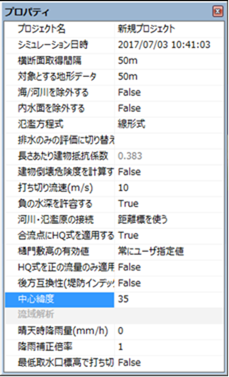
Figure: Project properties. -
Otherwise, click [cancel] the button to close the dialog.
Create new from template - UTM coordinates
Set the coordinate system to be calculated to UTM coordinates.
If the project has not been saved, a save confirmation message appears.
Select the menu to display the home screen.
This behavior is[New Projects] the same as if you select .
Open a project
When you select a menu, [Project selection] a dialog appears.
Select the project you want to open.
If you have not saved a previously open project, a save confirmation message appears.
Save Project
Save the project.
For new projects, a [Saving a project] dialog is displayed. Specify the save destination and save it.
If it is an existing project, save it over time.
Save Project As
When you select a menu, [Saving a project] a dialog appears.
Specify the save destination and [preservation] click the button.
The project is saved.
Importing a Project
-
When you select a menu, a [Importing a Project] dialog appears.
Select the existing project you want to import.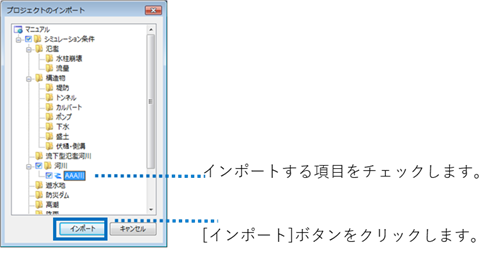
Figure: Import Project dialog -
Check the simulation condition items to import and [import] click the button.
The checked simulation conditions are imported.
Opening KML files
When you select a menu, [open] a dialog appears.
Select the KML file and [open] click the button.
The object appears on the map, and the data items are displayed as a tree in the Project window.
Opening SHAPE files
When you select a menu, [open] a dialog appears.
Select the Shape file and [open] click the button.
The object appears on the map, and the data items are displayed as a tree in the object window.
For data that does not have a coordinate system set, [Coordinate system selection] a dialog is displayed.
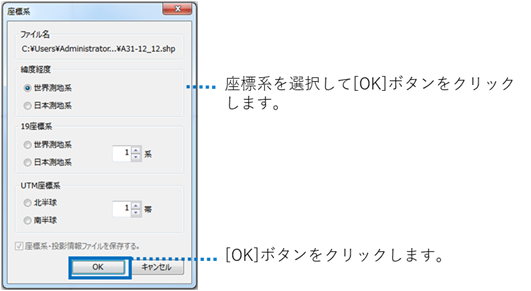
Figure: Shape file opening dialog
Opening LP data files
-
When you select a menu, a [open] dialog appears.
Select the LP data file and [open] click the button.
You can select multiple files by holding down the Shift or Ctrl key while selecting files. -
[Import LP data] A dialog will appear.
Specify the fields that correspond to the coordinate system, latitude longitude, elevation, and color.
button [confusion] or button [Ingest All] .
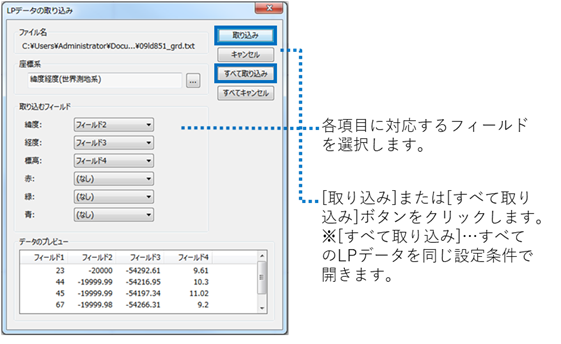
Figure: Import LP Data dialog
printing
When you select a menu, [printing] a dialog appears.
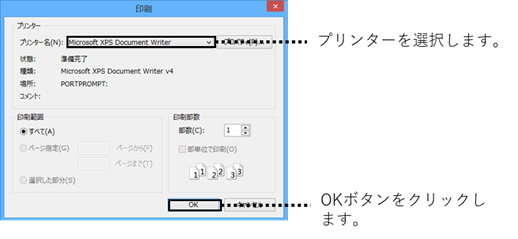
Figure: Print dialog
Select the printer and [OK] click the button.
The map screen prints.
Recent Projects
Select the menu to view a list of recently used projects. Select to open the project.
Application Termination
Select the menu to exit DioVISTA. If the project has not been saved, a save confirmation message appears.