Project/Simulation Results
Main applications
- You can export the simulation results.
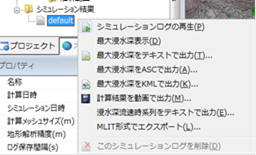 Figure: Simulation results
Table: Context menu items and functions for simulation results
| Context menu items | function |
|---|---|
| Playing back simulation logs | Replays the selected simulation results. |
| Maximum immersion depth display | Displays the maximum immersion depth of the selected simulation result. |
| Output the maximum immersion depth display as text | Outputs the maximum immersion depth of the selected simulation result in text format. |
| Maximum immersion depth display output by ASC | Outputs the maximum immersion depth of the selected simulation result in ASCII format. |
| Maximum submersion depth display output in KML | Outputs the maximum immersion depth of the selected simulation result in KML format. |
| Output calculation results as a video | Output the simulation results as a video. |
| Output flooded deep-flow time series as text | Outputs the immersion depth and flow velocity of the selected simulation result in text format. |
| Export in MLIT format | The selected simulation results are output in CSV and NetCDF formats in accordance with the Ministry of Land, Infrastructure, Transport and Tourism's Guidelines for Digitization of Flood Area Map Data (3rd Edition) Reiwa September of the first year". |
| Delete this simulation log | Deletes the selected simulation result. |
Playing back simulation logs
When you select the menu, the anime plays.
You can play any time with the flood simulation bar (shown below).
 Figure: Flood simulation bar
Table: Flood simulation bar items and descriptions
| indication | item | function |
|---|---|---|
 |
guidance | Displays the playback state and simulation time. |
 |
guidance | Δt, simulation calculation time, and mesh size. |
 |
Playback position | Indicates the playback position of the simulation results. You can change the playback position by dragging the mouse. |
 |
head | Moves the current playback position to the top. |
 |
playback | Replays the simulation results from the current playback position. |
 |
Playback speed | When pressed, a pull-down menu for the magnification selection of the playback speed is displayed. You can specify from 8x, 4x, 2x, 1x, 1/2x, 1/4x, and 1/8x. |
 |
end | Moves the current playback position to the end. |
 |
suspension | Stops playback and returns the current playback position to the beginning. |
 |
1 step back | Pauses playback and displays the simulation results one step earlier. |
 |
pause | Pause playback. |
 |
One step forward | Pauses playback and displays the simulation results one step later. |
 |
close | Exit the display of simulation results. |
Maximum immersion depth display
Select the menu to display the maximum immersion depth on the map.
Output the maximum immersion depth display as text
-
When you select a menu,[Save As] a dialog appears.
Set the desired destination and output file name, and[preservation] click the button.

Figure: Text output of maximum immersion depth display (Save As dialog) -
The calculation result file is stored in a text file where each item is separated by a comma and the line ends with CR+LF.
For more information about this file format, please refer to Technical Reference I/O functions/Export calculation results/Text format.
Maximum immersion depth display output by ASC
-
When you select a menu,[Save As] a dialog (shown below) appears.
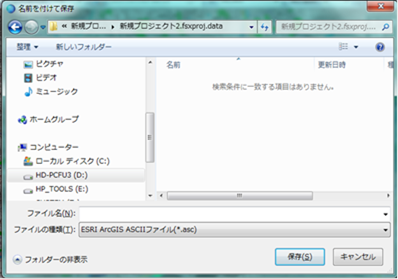
Figure: Maximum submersion depth display with ASC output (Save As dialog) -
Set the desired destination and output file name, and[preservation] click the button.
Maximum submersion depth display output in KML
-
When you select the menu,[Give it a name] the Save dialog (shown below) is displayed.
Select an output option.
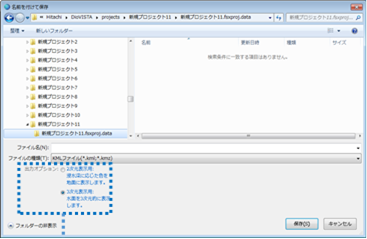
Figure: Maximum submersion depth display output to KML ([Save As] dialog)
1 2 3 4 5 6 | |
- Set the desired destination and output file name and [preservation] click the button.
Output calculation results as a video
-
When you select the menu, the video output dialog (shown below) is displayed.
-
Set output and input.
Table: Items and functions of output and input settings of calculation results
Output setting items function Output Folder * The non-editable
output destination folder is displayed. The
folder you selected when setting the output file name will be displayed automatically.Output File Name [...] Press the button to [Save As] display the dialog. 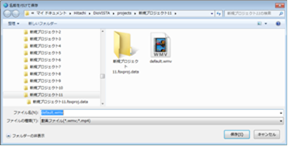
Set any destination and output file name [preservation] Click the button to update the settings.Video Formats 
Select the output format for your video.
It supports WMV and MPEG-4.Video length 
Set the length of the video to be output.Video size 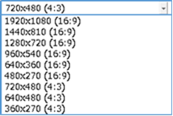
Set the screen resolution of the video.
The higher the resolution, the longer it takes to generate the video.Video bitrate 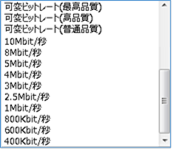
Set the video bitrate.
Normally, the default setting "Variable bitrate (high quality)" is fine. If you set
an extremely low value for the screen resolution set for the video size, the image quality will deteriorate.Input setting items function Frames per second Set the number of frames (frame rate) to draw per second of video.
The more frames per second, the longer it takes to generate a video.Base date and time * Displays the non-editable
simulation start date and time.Source length *
Displays the length of simulation time that cannot be edited. -
Set the desired destination and output file name, and[preservation] click the button.
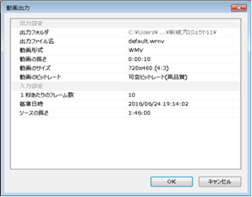
The progress dialog (shown below) appears. If you want to cancel the video output,[cancel] click the button.
1 2 3 4 | |
Output flooded deep-flow time series as text
-
When you select a menu,[Save As] a dialog appears.
Set the desired destination and output file name, and[preservation] click the button.
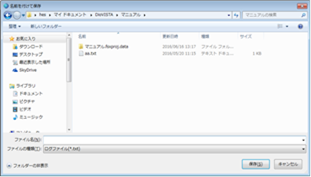
Figure: Text output of flooded deep-flow time series -
For the structure of the calculation result file, refer to Outputting the maximum immersion depth display as text.
Export in MLIT format
-
When you select the menu, the Export Calculation Results dialog (shown below) is displayed.
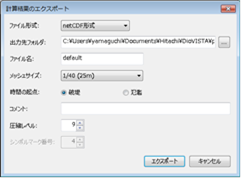
Figure: Export calculation results dialog -
Configure the export settings.
Table: Export settings and features
Output setting items function File format 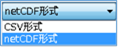
Select the output format of the file.Destination Folder [...] When you press the button,[Save As] a dialog appears. 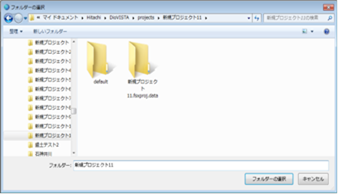
Set any destination [Select Folder] and click the button to update the settings.File Name Enter a file name. Mesh Size 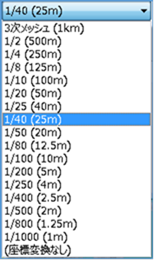
Select a mesh size.
By default, the calculated mesh size is selected.The origin of time 
Select the origin time of the output file.
Breaking: Starting from the start time of the breaking.
Flooding: Starts at the time of water entering the 2D flood model.comment Valid only when NetCDF format is selected.
Sets the string to be included in the comment attribute in NetCDF.
Blanks are usually fine.Compression level Valid only when NetCDF format is selected.
Set the NetCDF compression ratio to 0 (no compression), 1 (low compression) ~ 9 (high compression).Symbol mark number Set the symbol mark number from 1~4.
This number is used in other formats such as DXF. -
[export] button (shown below).
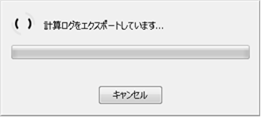
Figure: Export button※WL_STATION. Store the CSV in the folder specified in the "Guidelines for Digitization of Flood Expected Area Map Data (3rd Edition)" (Reference 34), and WL_STATION the "file name" set in the export dialog of the calculation result. When the calculation result is exported with the CSV breaking point No. matching, the breakage time is WL_STATION. Add to CSV.
Delete this simulation log
When you select the menu, a confirmation dialog (shown below) is displayed.
[Yes] Click the button to delete the simulation log.
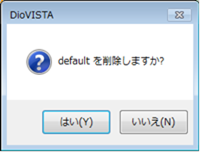 Figure: Deleting a simulation log (confirmation dialog)