Project/ Downstream Flood River/ Data
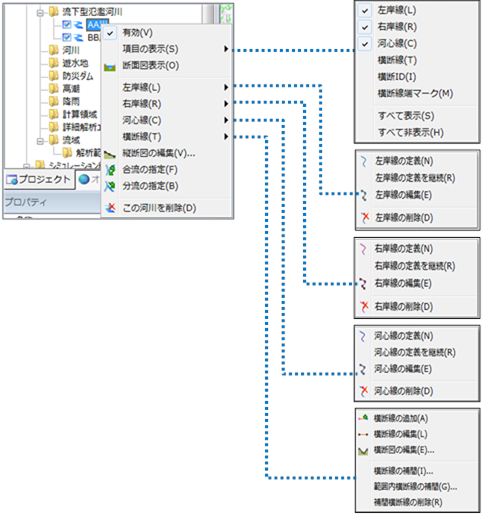 Figure: Downstreamed flood river data
Table: Context menu items and functions for downstream flood river data
| Context menu items | function | |
|---|---|---|
| valid | Enables or disables data for flowing flooded rivers. | |
| Displaying Items | Left Bank Line | Set the items to be displayed on the map. |
| Right Bank Line | ||
| Kawashin Line | ||
| Transverse lines | ||
| Cross-sectional ID | ||
| Transverse line end mark | ||
| See all | ||
| Hide All | ||
| Cross-sectional view display | Display the river cross-sectional view screen. | |
| Left Bank Line | Definition of the Left Bank Line | Define a new Left Bank Line. |
| Continue to define the Left Bank Line | Create a left bank line definition from the continuation. | |
| Edit the Left Bank Line | Edit the vertices of the left bank line you created. | |
| Deleting the Left Bank Line | Remove the left bank line. | |
| Right Bank Line | Definition of the Right Bank Line | Define a new right bank line. |
| Continue to define the Right Bank Line | Create a right bank line definition from the continuation. | |
| Edit Right Bank Line | Edit the vertices of the right bank line you created. | |
| Deleting the Right Bank Line | Remove the right bank line. | |
| Kawashin Line | Definition of the river line | Define a new Kawashin line. |
| Continue to define the Kawashin Line | Create a river line definition from the continuation. | |
| Editing the Kawashin Line | Edit the vertices of the created river line line. | |
| Deleting the Kawashin Line | Delete the river core line. | |
| Transverse lines | Add a cross line | Create a new crosser. |
| Edit a section line | Edit the vertices of the section line you created. | |
| Edit a cross-section | Display the cross-section view editing screen. Set the section information (section shape, edit right left and bank shoulder, edit roughness factor). | |
| Interpolate transverse lines | Creates an interpolated section for the entire river at specified distance intervals. | |
| Interpolate transverse lines in a range | Creates an interpolated section at specified distance intervals for the extent of the selected section. | |
| Delete interpolated transverse lines | Remove all interpolated transverse lines. | |
| Edit profile drawings | Display the profile editing screen. Check longitudinal information and set information for each cross-section (HQ formula, etc.). | |
| Specifying a confluence | Set the confluence of tributaries and main rivers. | |
| Specifying a Diversion | Set a diversion from the main river. | |
| Delete this river | Remove flowing flood rivers. |
valid
Select the menu to enable/disable it. If checked, it is enabled. When disabled, a × mark is displayed in the river data.
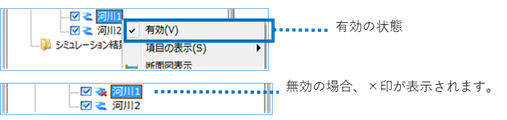 Figure: Enable/disable
Displaying Items
When you select a menu, the items appear. Select the items you want to display on the map and check them.
You can select Show all [See all] or Hide all to [Hide All] show or hide all items.
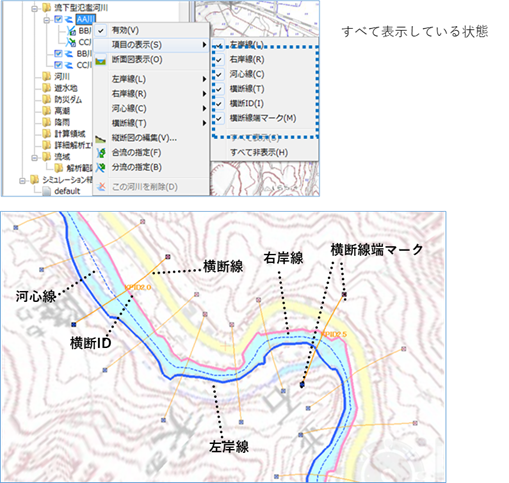 Figure: Displaying items
Cross-sectional view display
When you select the menu, the river cross-sectional view screen is displayed.
You can check the elevation of the cross-section and longitudinality, and check the simulated water level and flow rate.
In addition, cross-sectional and longitudinal information of simulation results can be exported.
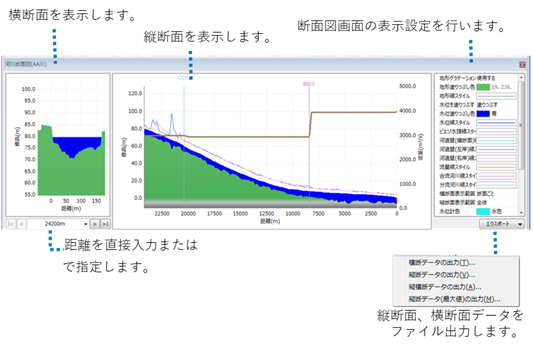 Figure: Cross-sectional view
Table: Export Simulation Menu and Output for Section View View
| Export Menu | Output content |
|---|---|
| Output section data | The displayed cross-sectional information "time (s)", "water level (m)", "water depth (m)", "flow rate (m^3/s)", "flow velocity (m/s)", and "overflow state" are output. |
| Output profile data | Distance marker (m), water level (m), water depth (m), flow rate (m^3/s), flow velocity (m/s), and overflow state are output at the displayed time. |
| Output of cross-sectional data | Cross-sectional information at all times, "distance marker (m)", "water level (m)", "water depth (m)", "flow rate (m^3/s)", "flow velocity (m/s)", and "overflow state" are output. |
| Output of profile data (maximum value) | Maximum value information for each cross-section, "Maximum water level (m)", "Maximum water level generation time (S)", "Maximum flow rate (m^3/s)", and "Maximum flow generation time (s)" are output. |
Left Bank Line/Right Bank Line/Kawashin Line
-
Definition of Left Bank Line/Right Bank Line/Kawashin Line
-
When you select the menu, the map will be in the created state.
下流側を始点として上流側をクリックして左岸線/右岸線/河心線を作成します。
作成中に1段階前の状態に戻すには、マウスを右クリックするか [BackSpace] キーを押します。作成をキャンセルする場合は、[Esc] キーを押します。
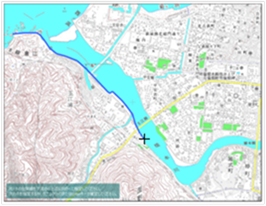
図: 左岸線/右岸線/河心線を作成 -
Double-click or [Enter] press to confirm the creation.
-
-
Continue to define the Left Bank Line/Right Bank Line/Kawashin Line
When you select the menu, the map will be ready to be specified from the continuation of the last point at the time of creation.
Click on the map to continue creating the Left Bank Line, Right Bank Line, and Kawashin Line.
To revert to the previous state one level during creation, right-click the mouse or [BackSpace] press the key. To cancel the creation of the Left Bank line,[Esc] press the key.
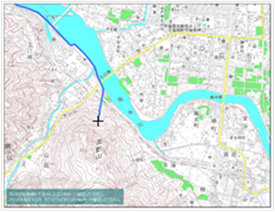
Figure: Continuation of the Left Bank Line, Right Bank Line, and Kawashin Line -
Edit Left Bank Line/Right Bank Line/Kawashin Line
When you select a menu, the line enters edit mode.
You can edit the vertices of the Left Bank Line, Right Bank Line, and Kawashin Line. To confirm your edits,[Enter] press the key.
Figure: Editing the Left Bank Line, Right Bank Line, and Kawashin LineEditing operations explanation Move vertices Select a vertex and drag it. 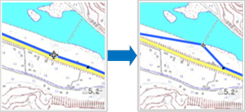
Add a vertex Click on the line to add a vertex. 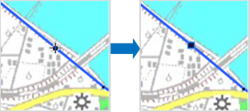
Delete a vertex [Ctrl] Hold down the key and click the vertex. 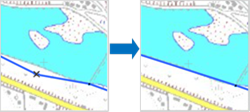
-
Delete Left Bank Line/Right Bank Line/Kawashin Line
When you select the menu, a confirmation message appears.
[Yes] Click the button to delete the Left Bank Line, Right Bank Line, and Kawashin Line.
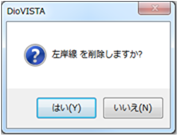
Figure: Delete the Left Bank Line, Right Bank Line, and Kawashin Line
Transverse lines
-
Add a cross line
-
When you select the menu, you can add a cross line on the map.
地図上で右岸線、左岸線と交差するように、横断線を選択します。
作成中に1段階前の状態に戻すには、マウスを右クリックするか [BackSpace] キーを押します。横断線の作成をキャンセルする場合は、[Esc] キーを押します。
図: 横断線の追加
-
-
[Enter] When you confirm the creation by pressing the key, the section view editing screen appears.
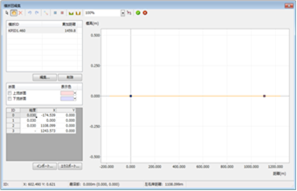
Figure: Cross-sectional view editing screen -
Set the section shape.
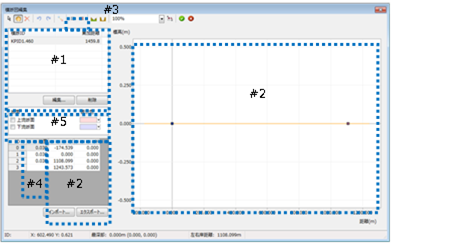
Figure: Set a section shapeTable: Operation details and descriptions of the section editing screen
On the section edit screen, you can perform the following operations.
Operation details explanation Edit section attributes [edit] When you select the button, the section attribute dialog is displayed. You can edit the section ID and cumulative distance.
You can also[deletion] select the button to remove the selected crossing.Create and edit cross-sections Create and edit cross-section shapes. Creation of cross-sectional maps (acquisition of terrain data)  Select the button to automatically create a cross-section from terrain data.
Cross-section vertex editing Create and edit shapes in cross-sectional drawings with mouse operation. Import/export of cross-sections You can import and export cross-sections as external files. Create a simple section The river cross section between the left and right banks is a defined cross-section (simple river channel). Left bank end, right bank end setting Change the left bank end and right bank edge. Setting the Roughness Factor You can edit the roughness factor in the grid table.
Specifying by import is the same operation as a cross-section.Superimposed display Displays the top and bottom sections. -
Creation of cross-sectional maps (acquisition of terrain data)
 [Terrain acquisition] icon to get terrain data and create a section.
 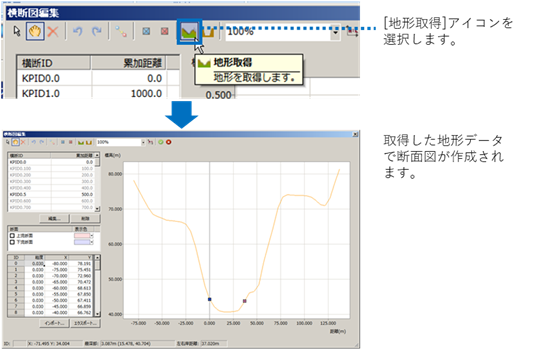 Figure: Creating a cross-section
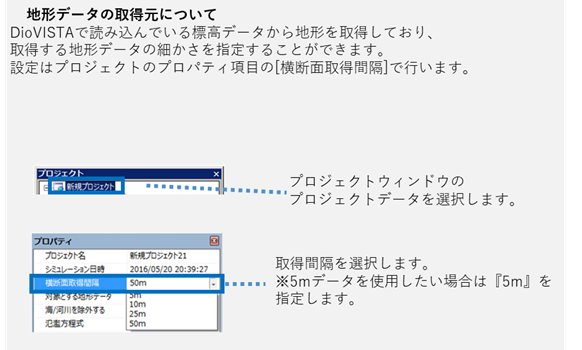 Figure: Where topographic data comes from
 -
-
 [choice] to enter selection mode and edit vertices.
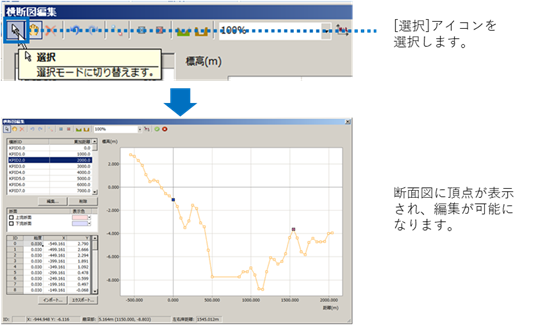
図: 横断図の頂点編集表: 横断図の頂点編集の操作と説明
以下の操作が可能です。
操作 説明 頂点の選択 選択する範囲をドラッグすると、頂点が選択されます。 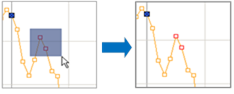
頂点を1点ずつ選択するには、[Ctrl] キーを押しながら頂点を1点ずつ選択します。
選択を解除するには、[Ctrl] キーを押しながら選択している頂点を1点ずつ選択します。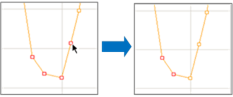
頂点の移動 頂点を選択し、ドラッグします。 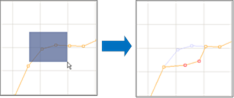
[Shift] キーを押しながらドラッグすると、水平/垂直移動します。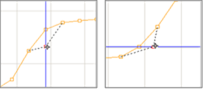
オフセット移動 頂点を選択し、  [オフセット移動] を選択します。
移動する値を入力して、[OK] ボタンを選択します。
頂点の追加 線上をクリックすると、頂点が追加されます。 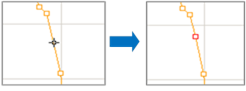
頂点の削除 頂点を選択し、[Delete] キーを押下します。 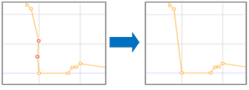
元に戻す 変更を1段階取り消します。  [元に戻す] アイコンを選択するか、[Ctrl + Z] キーを押下します。
やり直し 元に戻す(UNDO)を1段階取り消します。  [やり直し] アイコン を選択するか、[Ctrl + Y] キーを押下します。
 -
 [decision] to save your edits.
-
-
Import/export of cross-sections
-
[import] When you select a button,[open] a dialog appears.
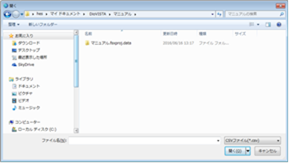
図: 横断図のインポート・エクスポート -
Select the CSV format file below, and[open] then select .
- Column A: Control number (sequential number from 1)
- Column B: Distance (m) (positive from left bank to right bank)
- Column C: Elevation (m)
- Column D: Roughness factor (does not reflect the roughness factor value in the last row)
- Column E: Left and right bank flags (1: left bank shoulder, 2: right bank shoulder)
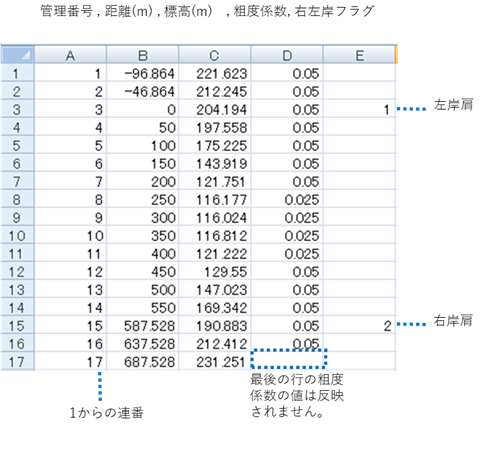
Figure: Importable CSV format (example of display in Excel) -
For export, a CSV file in the above format will be output.
-
-
-
 [Simple river channel] icon.
図: 簡易河道アイコンを選択 -
Set the conditions for the simple river channel.
初期設定では、断面線と左岸線が交差している地点が右左岸端に設定されています。
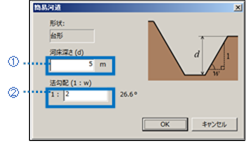
図: 簡易河道の条件設定表: 簡易断面の作成の項目と説明
項目 説明 ① 河床深さ 河床深さを指定します。
左右岸端の、低い方からの深さを設定します。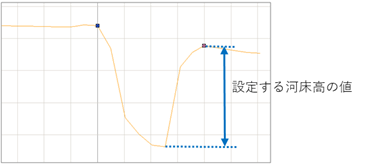
② 法勾配 法勾配(左右岸と河床の勾配)を指定します。 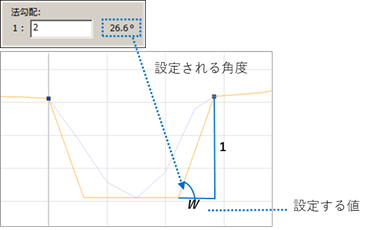
-
 [decision] to save your edits.
-
-
Left bank end, right bank end setting
-
 [choice] Select the icon to enter selection mode.
 -
Select the vertex that you want to be the left bank edge.
初期設定では、断面線と左岸線が交差している地点が左岸端に設定されています。
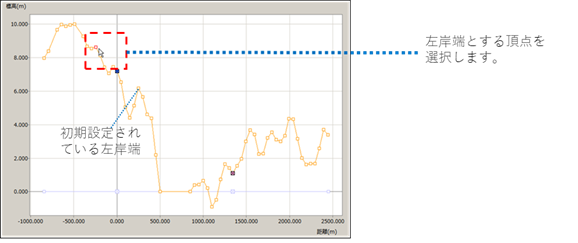
図: 左岸端の頂点の選択 -
 [Left bank end] icon.
 選択した頂点が左岸端に設定されます。
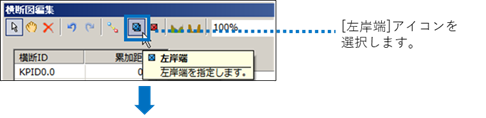
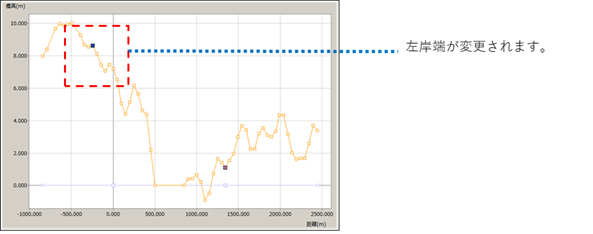
図: 左岸端アイコンの選択、設定変更 -
Similarly, select the vertex that you want to be the right bank edge, and
 [Right bank end] then select the icon.
 初期設定では、断面線と右岸線が交差している地点が右岸端に設定されています。
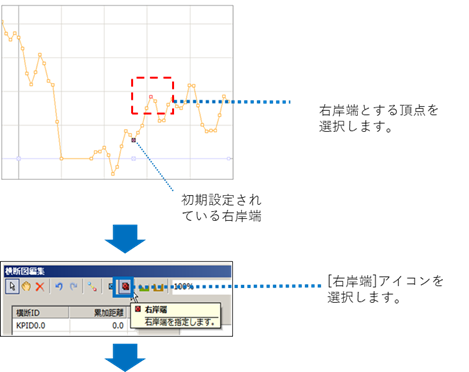
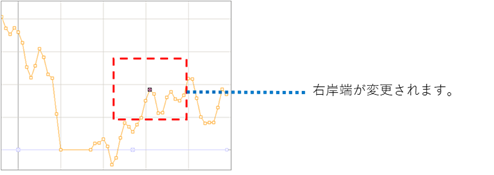
図: 右岸端の設定 -
 [decision] to save your edits.
-
-
-
Edit a section line
-
When you select a menu, you are in transverse line selection mode.
Click to select the crossing line you want to edit.
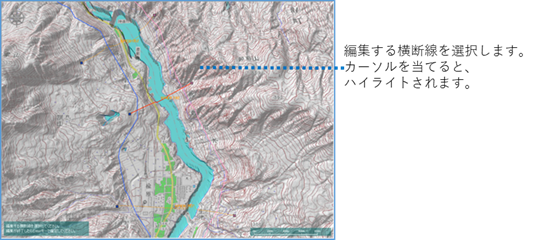 Figure: Selecting a transverse line.
 -
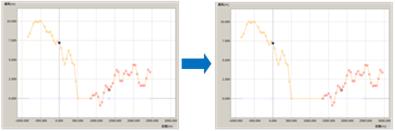
Drag the section end mark to change its position.
To undo one change, [edit] select the > [Revert] menu or[Ctrl + Z] press the key.
To undo one step of undo,[edit] select the > [redo] menu or[Ctrl + Y] press the key.
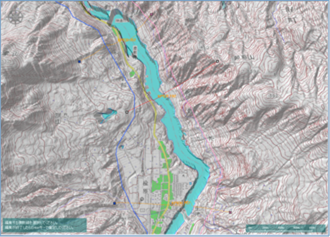 Figure: Repositioning a transverse line.
 -
[Enter] Press the key to accept the changes.
-
-
Edit a cross-section
-
When you select a menu, a [Cross-sectional view editing] dialog appears. Select the section you want to edit.
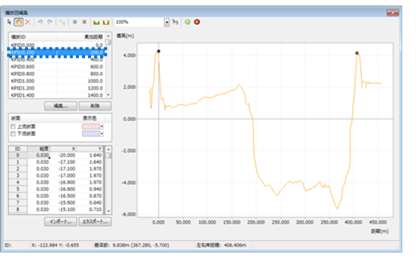 Figure: Selecting a section of a cross-section.
For detailed steps on the section edit screen, refer to Adding a section line.
-
If you want to cancel editing,
 select the [cancel] icon or [Esc] key.
 If you have made changes, a save confirmation message appears. If you do not want to save,[no] select .
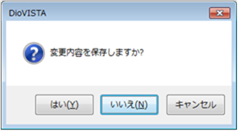 Figure: Saving changes
 -
If you want to finish with your edits,
 [decision] select the icon.
-
-
Interpolate transverse lines
When you select a menu,[Cross-section interpolation] a dialog appears.
Enter the interval you want to interpolate and[OK] click the button.
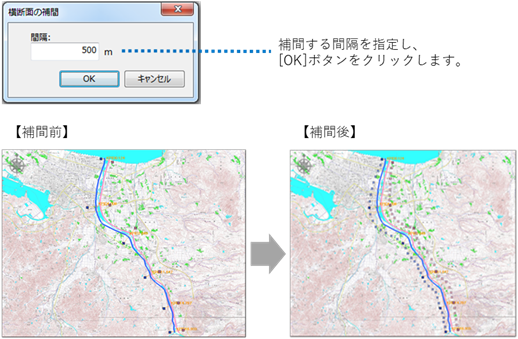
Figure: Interpolating a cross-section. -
Interpolate transverse lines in a range
-
When you select the menu, the map is in transverse line selection mode.
Click to select the upstream and downstream sections of the interval you want to interpolate.
To deselect, click again to select it.
[Enter] Confirm with the key.
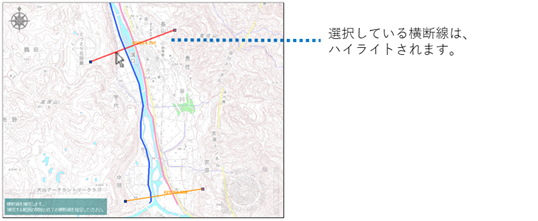 Figure: Interpolating cross-lines in a range
 -
[Cross-section interpolation] A dialog will appear.
Enter the interval you want to interpolate and[OK] click the button.
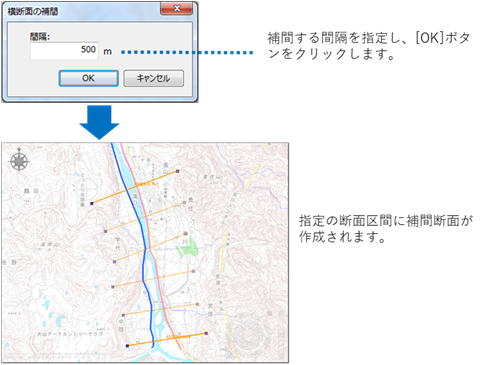 Figure: Filling in the Interpolate Cross-section dialog
-
-
Delete interpolated transverse lines
When you select the menu, a confirmation message appears. [Yes] Click the button to remove all interpolated sections.
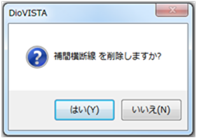
Figure: Delete interpolated transverse lines
Edit profile drawings
When you select a menu, a [Profile editing] dialog appears. Review and edit profile views.
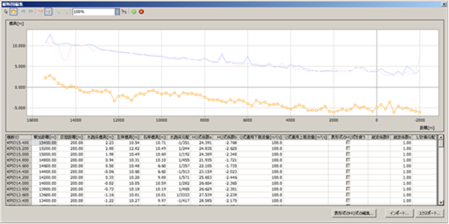 Figure: Edit Profile Dialog
Table: Editing Profiles and descriptions
On the profile editing screen, you can perform the following operations.
| Operation details | explanation | |
|---|---|---|
| Edit river channel elevation | Move only the elevation within the river channel | You'll only change the elevation inside the river channel. |
| Move the elevation of the entire river channel | Change the elevation of the entire river channel. | |
| Smoothing river channel elevation | Smoothes the river channel elevation for a specified extent. | |
| Setting HQ Expressions | Set the water level calculated by the 1D irregular flow model to be corrected by the HQ equation. Setting itemsYou can set the coefficients a and b of the HQ formula, the lower flow rate applied to the Q formula, the upper flow rate applied to the Q formula, and the HQ formula in tabular format. * If you check the Use tabular HQ expression check box, use tabular HQ data. |
|
| Setting the Overflow Coefficient | This setting is set when the overflow coefficient (alpha) is considered for water overtopping from a river. The setting items overflow coefficient θ and 1 / planned slope can be set. When you enter a design slope, θ is set so that α=1. |
|
| Import/Export of Section Data | Exports all items displayed in the profile screen in CSV format. You can also edit the exported file and import it. Only editable items are reflected. |
-
Move only the elevation within the river channel
-
 to enter selection mode.
 -
 [Navigating the river channel] icon.
Figure: Select the Move River Path icon.
-
Select a vertex and change the elevation.
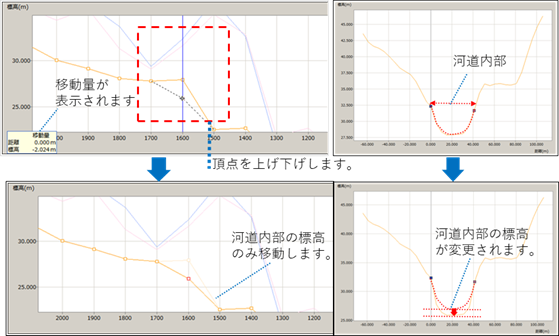 Figure: Select a vertex and change elevation
 -
 [decision] to save your edits.
-
-
Move the elevation of the entire river channel
-
 to enter selection mode.
 -
 [Move Entire] icon.
  Figure: Moving the elevation of the entire river channel
 -
Select a vertex and change the elevation.
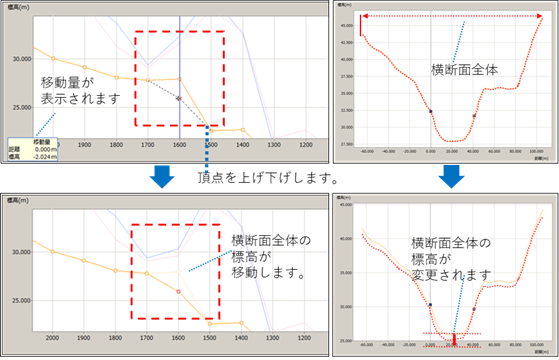 Figure: Select a vertex and then change the elevation
 -
 [decision] to save your edits.
-
-
Smoothing river channel elevation
-
 to enter selection mode.
 -
Select the vertices of the extent where you want to smooth the elevation.
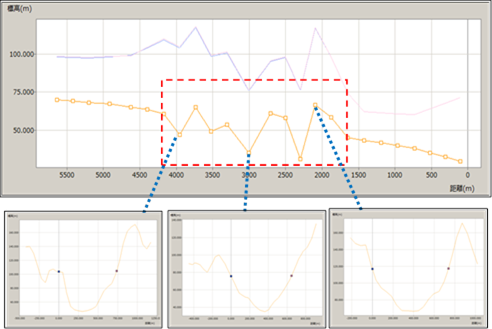 Figure: Selecting vertices
 -
 [Smoothing] Select Icon.
 The elevation of the selected range is smoothed.
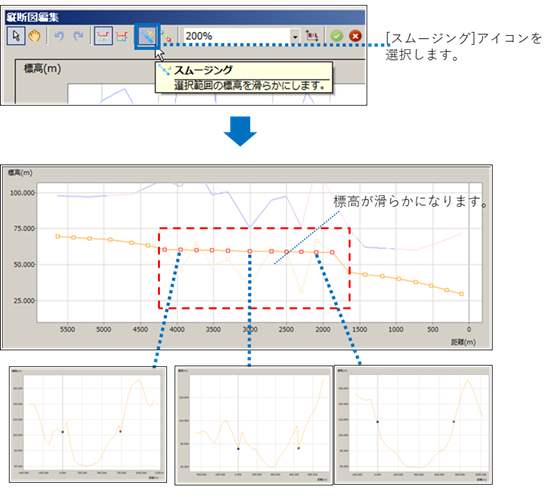 Figure: Select the smoothing icon.
 -
 [decision] to save your edits.
-
-
Use tabular HQ expressions
-
Select the data for the section you want to edit and[Editing tabular HQ expressions] choose the button.
The H-Q Formula Settings dialog appears.
-
Set the correspondence between water level and flow rate in the H-Q setting dialog.
As initial information, you can use the coefficients a and b of the profile view, the lower flow rate applied by the HQ formula, and the upper flow rate applied by the HQ formula.
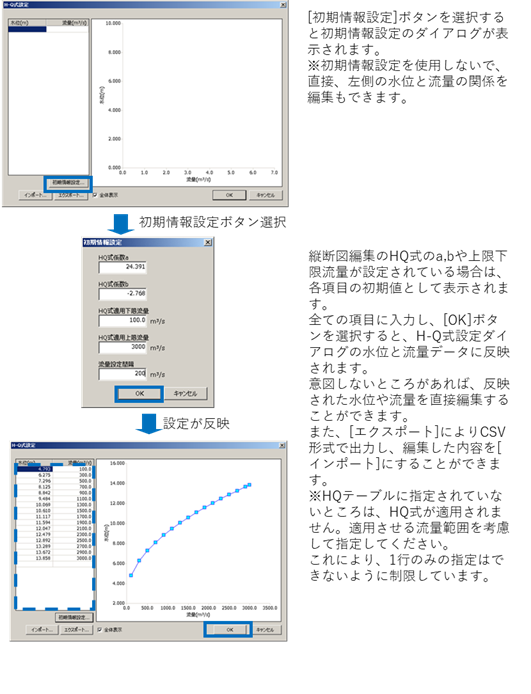 Figure: How to set a tabular HQ expression
 -
For profile editing,[Use tabular HQ expressions] select the check box.
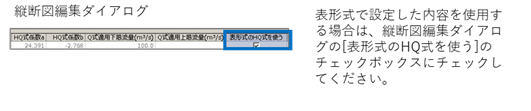 Figure: Check Using tabular HQ expressions for profile editing
-
Specifying a confluence
-
When you select the menu, you are in map selection mode. Click to select the left or right bank line of the river you want to merge.
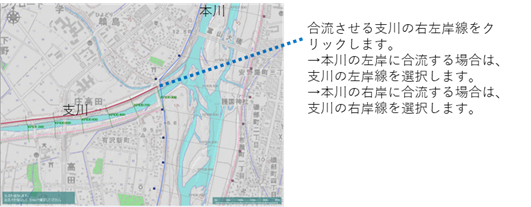
Figure: Select the left or right bank line of the river to merge. -
Click the confluence to specify it, and[Enter] press the key to confirm.
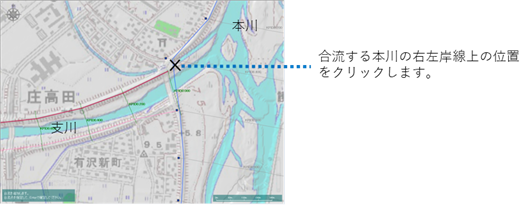
Figure: Specifying a confluence
Specifying a Diversion
-
When you select the menu, you are in map selection mode. Click to select the left or right bank line of the branch you want to divert.
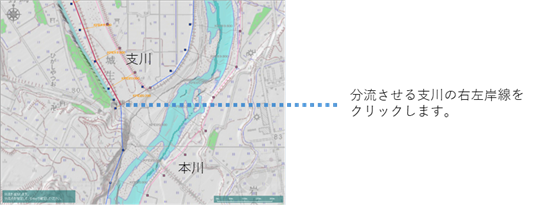
Figure: Select the left or right bank line of the river to be diverted. -
Click the confluence to specify it, and[Enter] press the key to confirm.
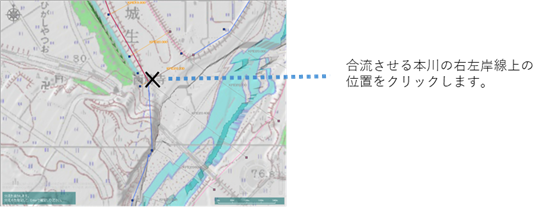
Figure: Specifying a confluence
Delete this river
When you select the menu, a confirmation message appears. [Yes] Click the button to delete the flowing flood river data.
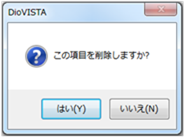 Figure: Delete this river.